
How to Draw a Face Step by Step: Loomis Method for Beginners
Nine pencil stages, from a single circle to a finished portrait, with what to draw at each stage and how to catch the usual mistakes.
By Sketch Steps Team9 min read
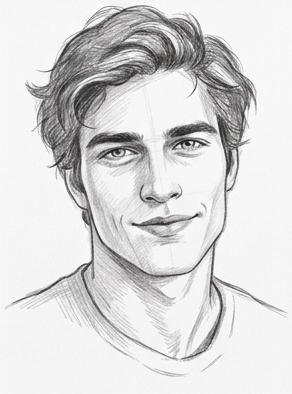
This tutorial takes you from a single circle to a finished pencil portrait in nine stages. It's based on the Loomis method: you build the head from a few simple shapes and guidelines first, and only then draw the eyes, nose and mouth.
The nine stages shown here were generated by Sketch Steps from a portrait photo. They are not an artist's sketches. Think of them as a reference you copy by hand: your job is to reproduce each stage on paper, one at a time. When the steps say "your reference," they mean whatever you're drawing from: this drawing for now, or a photo of your own later.
What you need
- A pencil you can draw lightly with
- An eraser
- Paper
- This page, open next to your paper, so you can compare after every stage
Keep your pressure light for the first five stages. Those lines are guides, and you will adjust them as you go.
The Loomis method in a nutshell
The method is named after Andrew Loomis, an American illustrator whose books, including Drawing the Head and Hands, are still widely used to teach portrait drawing. Its core idea is that you don't start with an eye or a nose. You start with the whole head: a ball for the cranium, flattened on the sides, with the jaw attached below it.
Lines on that ball tell you where things go. A vertical center line shows which way the face is turned or tilted. Horizontal lines mark the levels of the features. Classic Loomis diagrams split the face into three roughly equal parts: hairline to brow, brow to the bottom of the nose, and nose to chin. Real faces vary, so use those thirds as a starting point to check against your reference, not as a rule.
The example below follows this approach, but its guidelines don't match the classic diagrams line for line. Where they differ, the steps point it out.
Why bother? Because proportions are easiest to fix while the drawing is still a few light lines. Moving a circle takes seconds. Moving a finished eye means redrawing it.
How to draw a face step by step
Step 1: Draw a circle for the cranium
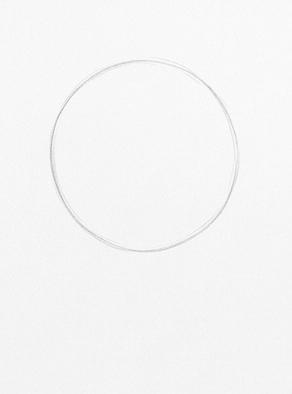
Draw a light circle in the upper part of the page. It stands for the cranium, the rounded top and back of the skull. The face, jaw and neck will hang below it, so leave plenty of room underneath.
It doesn't have to be a perfect circle. Look closely at the image and you can see a second, slightly offset line in places. That's a good way to work: several soft lines are easier to correct than one dark one.
Step 2: Add the center line and a horizontal guide
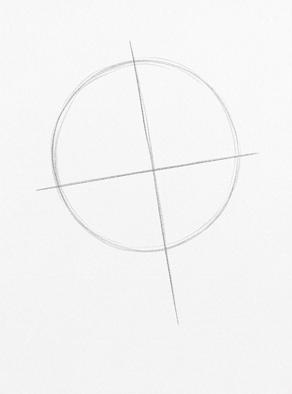
Draw a vertical line through the circle and let it run well past the bottom of it. The face continues down to the chin along this line. Then draw a horizontal line across the circle, close to its middle.
Notice that the cross is tilted. The head in this portrait leans slightly, so the vertical line leans with it and the horizontal line stays roughly at a right angle to it. Every feature you place on these lines later will follow the same tilt automatically.
A note on names: many Loomis diagrams call the middle horizontal line the brow line. In this drawing, the eyebrows end up just above it and the eyes are drawn along it in step 6, so here it works as your eye-level guide.
Step 3: Cut the sides and shape the jaw
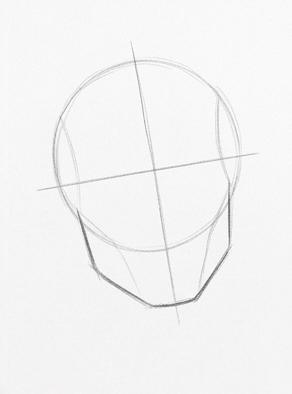
Now the ball starts to look like a head. Draw a curved line just inside the left and right edges of the circle. These mark the side planes: Loomis treats the sides of the head as flatter than a ball, so his method "slices" them off. From the front you see those flat sides almost edge-on, which is why they show up as narrow curves rather than the ovals you may know from Loomis diagrams of a turned head.
Carry those lines down below the circle and bring them in toward the center line to form the jaw. Here the jaw is made of a few straight segments and ends in a flat chin that sits on the center line. A couple of lighter lines also run from the lower part of the circle toward the corners of the chin.
Angular is fine at this stage. Straight segments are easier to judge than curves, and the jaw gets softened later.
Step 4: Place the eyebrows, nose and mouth
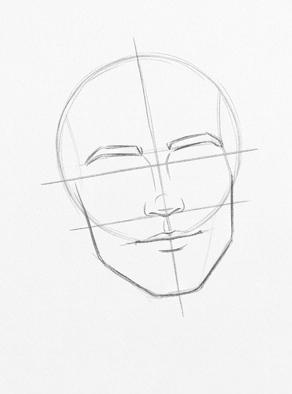
This stage adds more horizontal guidelines: a light one at the base of the eyebrows, one at the bottom of the nose, and a short one where the lips meet. They all follow the tilt you set in step 2.
These are the guidelines this particular drawing uses, not a fixed Loomis recipe. Classic Loomis diagrams work with a brow line across the middle of the ball, a nose line and a chin line, spaced as the thirds described above. This drawing puts the eyes on that middle line instead (see step 2). Either way, match the spacing to your reference rather than to a diagram.
Draw the eyebrows as simple outlined shapes, one on each side of the center line. For the nose, draw a few light lines down from between the brows, then the tip and the nostrils sitting on the nose line. Below that comes the mouth: the upper lip, the line where the lips meet, and a short mark under the lower lip.
In this drawing, the mouth sits closer to the nose than to the chin. Check the same distances on your own reference. You'll also see that the jaw was redrawn slightly in this step. Adjusting earlier lines as the features go in is normal.
The eyes aren't drawn yet. With the brows, nose and mouth in place, you have a frame to fit them into.
Step 5: Block in the hair, ears and neck
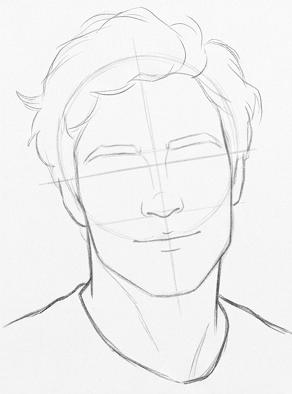
Draw the hair as one outer shape with a few large waves. Notice how far it rises above the circle: hair has volume, so its outline sits outside the skull, not on it. Leave individual strands for later.
Add the ears at the sides of the head. Here they're only hinted at and partly hidden by the hair, roughly between the eye-level guideline and the bottom of the nose. Then draw the neck down from the jaw, and the collar and shoulders of the T-shirt.
Step 6: Draw the eyes and add facial details
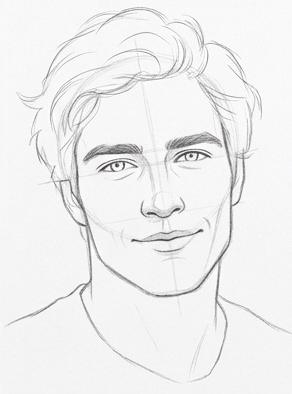
Now the eyes go in, along the eye-level guideline just below the eyebrows. Each one gets an upper lid, an iris and a pupil. Look at how the upper lid covers the top of the iris. Drawing the full circle of the iris can make eyes look like they're staring.
Darken the eyebrows, define the nose and the lips, and add the small creases at the corners of the smile. The hair outline is redrawn fuller in this stage, with the first strands inside it, so feel free to refine the shape you blocked in during step 5.
The construction lines are lighter now but still there. There's no need to erase them yet.
Step 7: Refine the line drawing
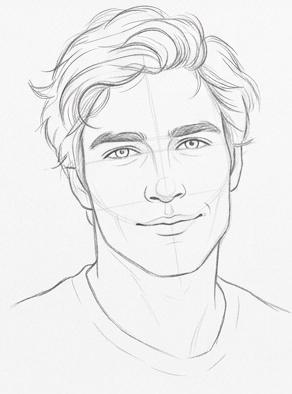
This is a cleanup pass, and the changes are subtle. The hair gets more strands that follow its waves, the eyes get darker lashes and lid lines, and the contours of the face, jaw and neck are refined. There's still no real shading.
If you compare this stage with step 6 and can barely see the difference, look at the hair first. That's where most of the new lines are.
Step 8: Add light shading
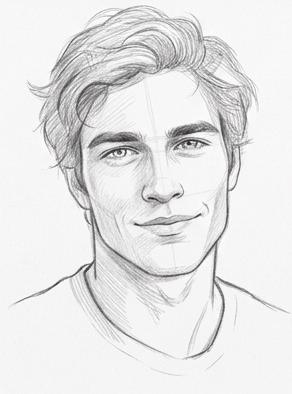
Start shading with light hatching, groups of parallel pencil lines. In this drawing, the first tones go into the hair, the sides of the face and nose, the neck and the shirt. Other areas stay almost white.
Keep the pressure light. Adding tone is easy; taking it away again is much harder.
Step 9: Build up darker values
Finish by darkening gradually. The hair gets its darkest strands, the shadows under the jaw and on the neck deepen, and the eyes and eyebrows gain contrast. Work in layers rather than pressing hard in one go.
Look closely and you'll find faint construction lines still visible in the finished sketch, for example the center line on the forehead. Erase them or keep them for a sketchbook look; that's up to you.
Common mistakes and how to fix them
- Pressing too hard early on. Construction lines should stay light enough to erase or draw over.
- Ignoring the tilt of the head. If the face leans, the center line and every horizontal guideline lean with it (step 2).
- Eyes too high. Check their height against your reference, not against where eyes "feel" like they go (step 6).
- A jaw that is too long or too short. Compare the length of the face with your reference before adding features (step 3).
- Hair hugging the skull. Give the hair volume above the circle (step 5).
- Going dark too soon. Build tone in light layers (steps 8 and 9).
How to practice
Draw the first three stages several times before going further: circle, cross and jaw, at different sizes and tilts. They're quick, and they're where proportions are decided.
Then work through all nine stages with this drawing as your reference, comparing after each one rather than only at the end. Mistakes are easiest to fix in steps 1 to 4. When that feels comfortable, try the same process on a photo of another face looking at the camera.
If you'd like stages like these for a face you choose, Sketch Steps turns a photo into a step-by-step drawing tutorial, and you can go through it one step at a time or as a scrolling list. The interactive demo on our homepage shows the same nine stages used in this article.